I’ve spent a while writing a Headless Knight guide for the friendly community. I hope it helps you all out with some strategies as well as simplifying anything you may find complicated.
Also see – Headless Knight codes
Headless Knight Beginner’s Guide: Best Setup, Companions, Equipment, & More
What do I buy with gold?
Ideally, you should spend your gold in order to accelerate your growth as much as possible early on. The higher you push, the better the rewards (more gold from levels and more chests to open).
Gold upgrade order (for beginners):
Enhance Attack > Enhance Defense > Critical hit rate > Critical hit damage > Enhance HP > Suppression > Hit
Now there is an exception to this priority order because Suppression/Hit will eventually become an invaluable stat to progress, when this happens the priority will change.
Suppression > Hit > Enhance Attack > Enhance Defense > Critical hit rate > Critical hit damage > Enhance HP.
Gold upgrade order full:
Enhance Attack > Enhance Defense > Critical hit rate > Super critical hit rate > Critical hit damage > Damage to Ancient Dragons > Combo rate > Super enhance attack > Resistances > Super enhance defense > Suppression > Hit
And once again, if you have progressed very far, suppression and hit will be at the top of the list until you no longer need them again.
What do I spend my Talent points on?
The aim of spending ‘talent points’ is very similar to gold, however since you can reset your talent points you will have two pages with different stat priorities(farming and pushing)!
Farming – Farming is a term used for laying low on a stage that you clear the fastest you can clear, approximately 5 seconds is the ideal clear speed, in order to farm gold and EXP when you can’t climb further.
Pushing – Pushing is a term used for using ALL your resources to climb to the highest stage possible for your character to gain the most chests, diamonds, and other resources.
Farming Setup (For beginners):
Gold drop bonus > Experience drop bonus > Attack speed > Movement speed > Level Treasure Chest Drop Rate > Super critical hit rate > Super critical hit damage > Suppression.
Pushing setup (For beginners):
Attack speed > Movement speed > Super critical hit rate > Super critical hit damage > Suppression.
Farming setup (General):
Gold drop bonus > Experience drop bonus > Attack speed > Movement speed >
Level Treasure Chest Drop Rate > Super critical hit rate > Ultimate critical hit rate > Ultimate critical hit damage > Super critical hit damage > Attack > Suppression > Hit.
Pushing setup (General):
Attack speed > Movement speed > Super critical hit rate > Ultimate critical hit rate > Ultimate critical hit damage > Super critical hit damage > Attack > Suppression > Hit.
These orders are subject to change depending on how much critical hit rate you have of super and hyper-critical hits. If you have too much super critical hit rate, you can spend your points elsewhere.
Equipment
The optimal way to spend about 70-80% of your summons on weapons and 20-30% on armour until you have a System (Red quality) sword. This is because you will only summon swords on weapon summons, whereas you have 3 different armour types to collect.
Once you have a System quality sword, it is best to catch your armour up a bit to improve your suppression, as the ring will be most of this stat.
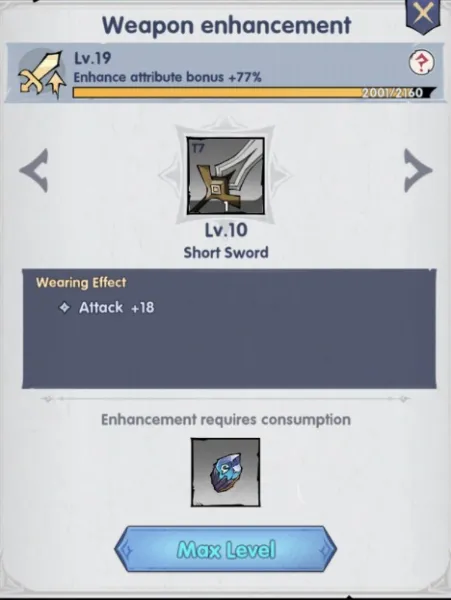
Now, the best way to spend Enhancement stones is on your weapon early. It won’t be wasted because later on you will want to use this benefit on your Enhance attribute bonus.
Even if you upgrade your current weapon, you will still benefit from the bonus at the top of this image, so no materials will be wasted overall.
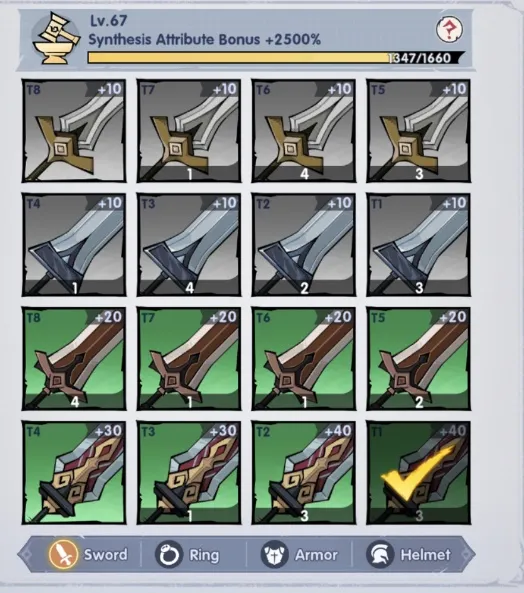
Once you get to higher tier weapons, you want to try to avoid spending Enhancement stones and start spending them on lower tier weapons and armour to improve this Enhance attribute bonus further since it is more valuable as an additional multiplier.
As you can see in these images, all the grey and green rings are maxed out at a very low material cost (about 2-3000 enhancement stones).
Companions
Each companion has their strengths and weaknesses and falls under a certain rarity. There is no particular companion which is the best in every situation as I will explain later.
Great System Level (Rainbow): Talia, Cinderella, and Eluna.
System (Red): Demon hunter (Suppression passive), Necromancer (Incredible healing), Succubus (Control), Nurse bunny (Damage buff + Attack speed), Dragon maiden (Super critical + Hit bonus), Freezing witch (Energy recovery reduction), Time witch (Ult skill CD), Demon Treasure Chest (Chest drop rate), Chainsaw man (Attack speed bonus), Frost dragon maiden (not recommended), Party songstress (HIGH Attack speed buffs), Pirate (not recommended).
Legend (Yellow): Spirit fox, Axe bunny (combo rate), Pumpkin monster (critical hit damage), Lucky young dragon (Crit bonus), Traveling cat (Dmg reduction), Slime (not recommended), Cursed doll (dmg buff + dmg reduction buff), Sprite dragon (CD reduction), Hell dice (not recommended), Tech doll (Time buff).
Hero (Purple): Golden Pig (MUST HAVE gold bonus), Dr. Owl (MUST HAVE EXP bonus), Little grim reaper, Demon eye spider (boss dmg buff), Shiba Inu (dmg reduction).
While it says above that no particular companion is best, we can still use general setups for pushing:
Eluna/Talia/Cinderella (If you have one of them),
Nurse bunny (Multiple useful buffs),
Dragon maiden
Time witch
AND for farming, the ideal setup is:
Your strongest clear unit, probably your highest level (System or higher),
Golden Pig (Hero)
Dr. Owl (Hero)
Early on, it is required to level your golden pig and Dr Owl to level 50 in order to gain the maximum bonuses they provide (100% gold drop and 100% exp gain).
Later on, you will need to level them to 200 to unlock their refinement bonus and have 3 legends or higher refinements.
Favor
This feature is hidden behind System or higher companions. You can give them materials in order to unlock extra bonus stats as well as shards to upgrade their stars.
There are some VERY helpful bonuses you can get from this which need to be considered carefully before using these materials each day, for example:
Succubus (system) gains suppression power from favor, which you may be in great need of later in the game. Also, think about which companions you want the shards for as well as the bonus stats being important.
Nurse Bunny for example is a very strong companion and should be considered simply for her shards if you are short on them.
Hero skills and Emblems
Emblems are very simple, they are better to collect once you have gotten your sword to System T4(Red) as they are all % multipliers, so they gain more value later on. Don’t pull emblems before this point, not worth it.
When it comes to skills, the best skills are all stun or knock-up related to reducing your damage taken throughout fights.
The best three basic abilities are Summon Lightning, Flame Fall, and Summon Hurricane and this remains the same throughout most content.
The ultimate abilities however have some flexibility:
Demon Descend is good for farming setups to clear the map faster.
Barren Domain has very high damage output when combined with Flower of The Other Shore (Head).
Dark Sun Dark Light is good for when you need more stuns (high damage taken).
Heads (broken) Tier List
As you may have seen, Heads have broken bonuses for the first 5 stars, but once you reach 6 stars new effects are unlocked. This first tier list is for the broken (pre-6) heads.
- S tier: Flower of The Other Shore (With Barren Domain), Divine corpse, Young Medusa (Stun).
- A tier: Young Medusa (Stun), Hypnotic flower (Sleep), Executioner’s Head (Farming only), Dummy substitute (big damage), Soul Lantern Head (Farming only).
- B tier: Demon Descend, Planet Head, Sea God’s Head.
- C tier: Skeleton King’s Skull, Head of the King’s Giant Cannon, Lich King’s Skull, Siren’s head.
Flower of the Other Shore (With Barren Domain skill) has very nice synergy and reduces healing effects which is very useful for bosses and dungeons as well as dealing 50% extra damage. I would highly recommend this head until you have 6-star other options.
Another important thing to take into account for Enhancement stones is that you can use them on Heads for their extra Hold effects.
The “Skull Attack/Defense/HP bonus” heads are all worth using stones on for the extra damage.
Heads (Perfect/6 stars+) Tier List
- S tier: Flower of the Other Shore, Divine Corpse, Sea God’s Head.
- A tier: Skeleton King’s Skull.
- B tier: Hypnotic Flower (Sleep), Executioner’s Head (Farming only), Dummy Substitute.
- C tier: Young Medusa, Head of the King’s Giant Cannon, Planet Head.
- D tier: Demon Mask, Lich King’s Skull, Siren’s Head.
All of the top-tier heads either have Control abilities or have very strong buffs/debuffs to bosses and your protagonist.
Some things are definitely better than others, but playing what you feel is most satisfying/fun, they all seem to be good for farming.
Refining
Generally, the best stats to refine for are Core Attack Bonus, Core HP Bonus, and Core Defense Bonus, and then just move on to stats which your protagonist is missing the most. You will need to look at your own character for most of these.
Magic Sword Stat Priority: Core Attack Power Bonus > Super Critical hit rate > Suppression (Only if needed).
Weapon Stat Priority: Super Critical hit damage > Critical hit damage > Attack Speed > Suppression.
Ring Stat Priority: Attack Speed > Movement Speed > Suppression.
Armor Stat Priority: Core HP Bonus > Defense Bonus > HP Bonus > Suppression.
Helmet Stat Priority: Attack Speed > Movement Speed > Suppression.
An important thing to remember is you can go back to previous equipment tiers to unlock the Active effect to gain permanent stats while not having to equip the items.
Here is an example of an early tier magic sword used to gain a gold coin drop bonus.
Head Stat Priority: Critical hit damage > Skull Attack Bonus > Skull Defense Bonus > Attack Bonus > Defense > HP.
Companion Stat Priority: Any Core Bonus > Critical hit damage > Super critical hit rate > Suppression.
SELF
Self Enhance is a function unlocked at stages 21-10. To explain in the simplest terms possible:
As clarified earlier, the System corresponds to the Red tier of items and companions. To unlock the Self Enhance function, you must first unlock the slot shown in the image above, System (Red) Tier1.
Relics
Relics are most definitely worth summoning with red diamonds, they give you unique effects which make events more important as well as huge damage effects, and huge loot increases. They are incredibly important, don’t underestimate them.
They are all individually quite strong, some much better than others. There is no tier list for these since you can’t target them, you just get them from events and summons as you progress through the game.
Skins
If you have an excess of blue diamonds, I would recommend purchasing both of the rebate skin sets. They cost 600,000 diamonds, but return 300,000 back to you. The bear skin from 30,000 Golden coins is also worth purchasing if you can save enough of them.
Most other skins will cost money, I would recommend the Serpent skin from Queen’s Lair, and generally, any skins which give you Experience drop/Gold drop/Chest drop/Critical hit rates and damages.
Tavern
Taverns are incredibly important to your progress in Headless Knight Idle.
The daily sign-in provides you with materials.
The Bounty boss is very rewarding, giving weekly rewards based on how much damage you do. It’s important to remember to re-challenge it each time you gain a big damage increase so you don’t miss out on rewards.
The Draw function provides you with a random amount of blue diamonds daily depending on how lucky you are!
When using the Play function, it is recommended to select the ones with tickets as this will be the most valuable.
The Drink function is the most important tavern feature.
You get 10 chances every day to refine your drink, you will gain huge stat increases from this, make sure you try to get the active effect, 300% critical hit damage is A LOT!
The final function, Donate, is actually more important than you might think.
You need to donate red diamonds here to increase your stats from the Full Glass of Rum relic which gains stats based on your donation amounts.
Dungeons
ALWAYS PUSH EVERY DUNGEON TO THE HIGHEST YOU CAN BEFORE SPENDING TICKETS, YOU WILL GAIN MORE MATERIALS THAT WAY. YOU WILL ONLY USE TICKETS IF YOU FAIL BOSS CHALLENGE, THE OTHER DUNGEONS YOU CAN TRY TO PUSH AS MANY TIMES AS YOU LIKE.
Let’s get into the types of dungeons in Headless Knight Idle.
Skill Book Dungeon (Ancient Dragon)
This dungeon is your ONLY source for upgrading your protagonist’s skills, you want to make sure you at least ‘close’ to the recommended suppression value.
Companion Experience Dungeon (Ancient Dragon)
This is arguably the most important dungeon, it is a source for ‘favor’ items which are incredibly valuable, as well as companion experience which you need to get your main three companions to level 360 for all of their ability upgrades.
Tower of Treasure
This dungeon gives you the Royal Coins currency which allows you to purchase skins and buy event currencies also. It provides a high source of blue diamonds alongside different dungeon tickets at every level of completion. Push this dungeon as much as possible.
Title Dungeon (Ancient Dragon)
The Title dungeon gives you Honor Points to upgrade your protagonist’s titles in the ‘Lord’ screen. This one is very straight forward, the points can only be spent on one thing, the Title feature on the Lord screen, found between the Emblem and Skill feature.
Enhancement Stone Dungeon (Ancient Dragon)
This is the other dungeon which is tied for most importance, these Enhancement stones are required to improve equipment and heads, and refine any of your companions or equipment.
Boss Challenge Dungeon
The main challenge with this dungeon is meeting the Hit criteria to complete it. I recommend making sure your power is significantly higher than the Boss challenge level so that you can kill it quickly when you miss hits.
This is very important as well as you will receive Heads fragments in order to upgrade them and eventually reach the Perfect status (6 stars).
Queen’s Lair
This dungeon uses 4 of your companions instead of your Lord Protagonist. I suggest you use your strongest 4 companions, however, if you want to be optimal you will want one healer and a setup with a lot of Control, this boss does a lot of damage.
The rewards are very nice, and scale up the further you complete it. You will be able to claim your rewards daily from this dungeon.