In this SpellForce Conquest of Eo Hero guide, you will find an in-depth explanation for each unit in the game. It focuses on how to use the unit on the map, how to choose your skills, and what to shop. The Hero is the most important unit in your game.
Therefore, there is a lot to learn and do with him. At the start of the game, 80% of your focus will be on your hero. Past minute 30, he will still take 10-20% of your attention, because his power will have scaled with your army.
In general, heroes’ active abilities are much better than relying on basic attacks and passive skills. Because of this, focus regeneration and cooldown perks are really important. Because the hero expands your base, your first action in the game should be starting your hero production, and then placing your economy buildings.
Fighting for the contested flag in the middle of the map may decide the whole game dynamic, while 2s more of the main base worker production won’t change anything.
If the hero dies, the rebuilding time increases with the hero level. So do your best to keep your hero alive, using potions, and healing spells. There are edge cases where dying is actually beneficial, so you come back to full health.
For similar content, check out SpellForce Conquest Of Eo races guide.
SpellForce Conquest of Eo Hero Guide – All Units
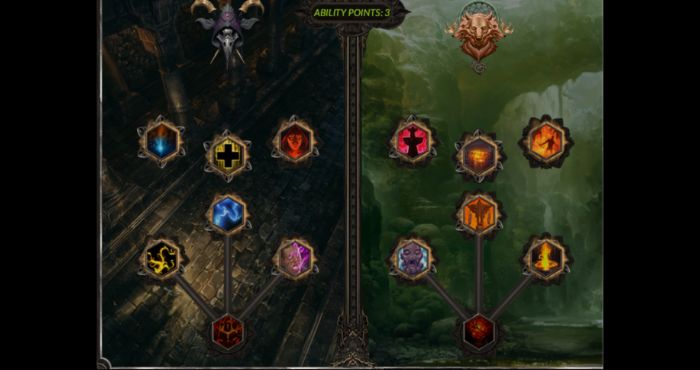
Humans
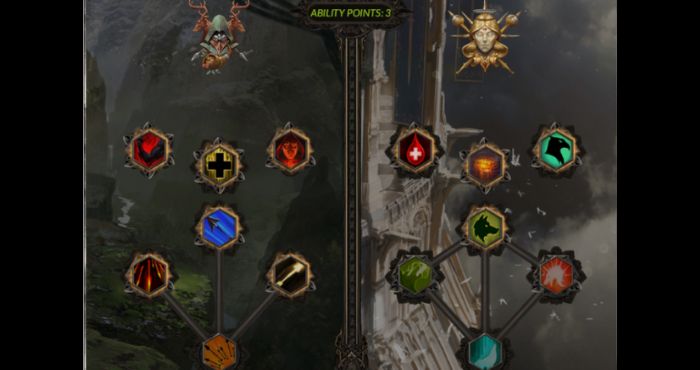
Wolfguard Commander
Concept
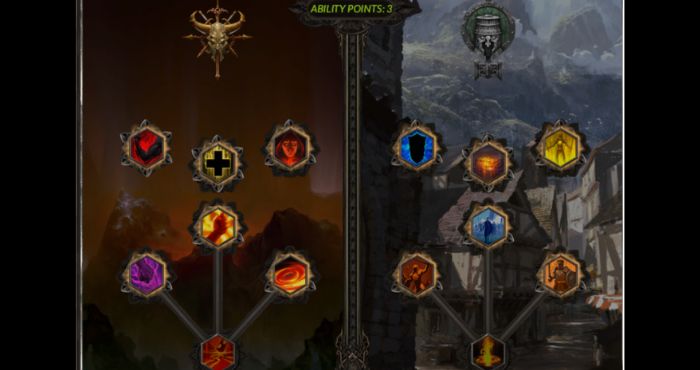
The wolfguard is a melee hero. She can rely on her own for the first stages of the game, and later, she uses her aura to greatly improve the value of the Army. Her perks help her defense and healing her and her troops.
| Level | Default |
| 1 | Shadow strike, Whirlwind, Focus |
| 2 | Cooldown, Focus |
| 3 | Power, Cooldown |
| 4 | Power |
| 5 | Whirlwind, EarthShatter, Focus |
| 6 | Focus, Aura of Tenacity |
| 7 | Aura of Retaliation, Hymn of Immortality |
| 8 | Focus, Power |
| 9 | Power, HP |
| 10 | Power, HP |
Default
The way to play the default Wolfguard is to make the best synergies with Shadow Strike. Use this spell to place your spell and then use your whirlwind and/ord earthshatter for maximum damage. You can also use that spell to escape bad situations. Once you reach the aura, make sure the auras are active, because otherwise it’s wasted points.
The true power of Wolfguard unlocks at level 7 with Hymn of immortality. Apply pure damage on your group of abalest, to 1 shot enemy heroes. They will also cause significant siege damage with that method.
It also is extremely efficient with champions, with their high damage AoE in addition to the shield. If you decide to go on a harassing spree, you may consider taking the healing perk top right, to reduce your potion consumption.
Royal Mage
Concept
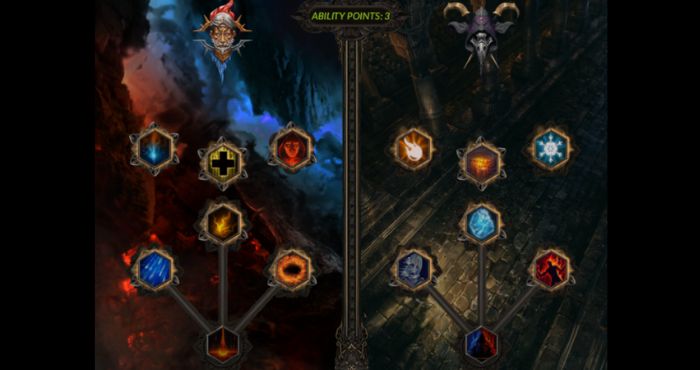
The royal mage is an elementalist. It’s a caster with high damage and control potential. His ice spells are control oriented while his fire spells are damage oriented. His spells have good synergy, generating stacks of “Might” and additional damage while concentrating on an element.
| Level | Default | Troll killer | Mighty mage |
| 1 | Hailstorm, Biting frost, Focus | Hailstorm, Biting frost, Focus | Hailstorm, Fire nova, Focus |
| 2 | Fire nova, Focus | Spark, Focus | Biting Frost, Ice might |
| 3 | Cooldown, Cooldown | Fire might, Ice might | Fire might, Focus |
| 4 | Power | Cooldown, Cooldown | Cooldown, Cooldown |
| 5 | Hailstorm, Cooldown, Starfall | Hailstorm, Starfall | Hailstorm, Starfall |
| 6 | Focus, Ice shell | Absorb the elements, Ice shell | Absorb the elements, Ice shell |
| 7 | Biting frost, Fire nova | Cooldown, Focus | Cooldown, Focus |
| 8 | Fire might, Ice might | Power, Power | Power, Power |
| 9 | Power, Power | Power, Power | Power, Power |
| 10 | Power, Power | Power, Power | Power, Power |
As you can see from the 3 builds here, the outcome is quite similar. The conclusion is that it is mostly about how you want to start your hero. This can be dictated by the matchup, or the map, and therefore the creeps. You notice that a main strategy around level 5 is to get the Hailstorm with Starfall. Starfall can easily be avoided, but if you pair it up with Hailstorm, it is guaranteed to hit at least a couple of units.
That hero tends mid-game to end up in weird positions, especially because of Fire Nova, hence the Ice Shell choice, to survive longer (take a potion, TP out). The royal mage likes his wide panel of options. However, if you don’t want to use them all, you can skip some spells and get faster on power.
Default
In that build, we focus on AoE and control. It is an efficient build to kill level 1 bandit groups. We are quite heavy on focus to sustain the spam. Note the fact that we try to get later to biting frost 2, as it sometimes leads to paralyzing the enemy hero for 10s.
Troll killer
In that build, we focus on single-target damage. We try to get the options to pick off single trolls. We consider taking the Fire and Ice might, however, their return on investment could be unimpressive early on. It could be a good idea to take Ice Shell earlier, and waste some troll damage.
We take the perks on level 3 to try to weaken the trolls trying to catch up to the hero. However, if you manage to keep your range, cooldown is probably more profitable.
Mighty mage
Here, we try to build up on the Mights to quickly get to Absorb the elements. Since we get very on perks, we prefer fire nova over the single target spells, because we probably end up in melee more often than desired. It is also the best level 1 build to take care of zombie groups. Remember that you can spam your spell in nothingness, just to keep your stacks of Might up.
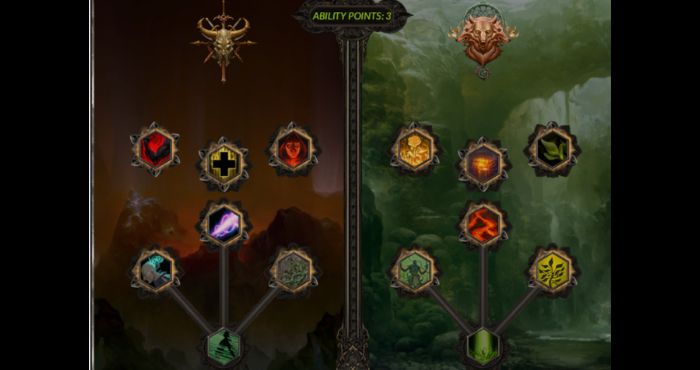
Elves
Ranger
The ranger is a ranged hero. She might be the easiest hero to play, as her default build is very straightforward. Her right tree relies on her summon, which is a wolf or bear.
Her perks synergize with her two trees, adding range or survivability to her pet. Overall, she behaves as a damage dealer and negates opponent heroes.
| Level | Default | Beastmaster |
| 1 | Hail of Arrows, Summon, Focus | Hail of Arrows, Summon, Focus |
| 2 | Power, Trueshot | Focus, Bullseye |
| 3 | Cooldown, Bullseye | Cooldown, Martyrical sacrifice |
| 4 | Focus, Cooldown | Howl, Spirit companion |
| 5 | Cooldown, Bullseye | Summon II, Moonwell |
| 6 | Power, Power | Spirit companion * 2 |
| 7 | Power, Power | Focus, Howl 2 |
| 8 | Power, Eagle Eye | Power, Cooldown |
| 9 | Eagle Eye, Eagle Eye | Power, ¨Power |
| 10 | HP, Focus | Power, ¨Power |
Default
In that build, we try to maximize the value of the hero alone. We only need 3 spells mid game for the whole game, therefore we can afford a lot of points in power and cooldown. We often see players taking the wolf to help creeping and harassing early game.
However, if you don’t want to manage the wolf, which can get costly in focus, you can skip it for more power. The rest is all about spamming the spells.
Note that bullseye is really good at interrupting spells and teleports. Silence is a great benefit on level 5.
It’s critical to use the Hail of arrows properly. It needs to land on units as much as possible. It can also be used to zone areas. That means that the opponent has to keep moving out of the target area, so is not actively damaging your units.
Beastmaster (Experimental)
This build is new in FG and not much tested. The idea is to go as much as possible towards the summon. Notice that the start is quite similar as the default build. However, instead of cooldown and power, we invest points in getting the wolf to tank.
We still can’t skip hail of arrow and bullseye, for a consistent damage and control of the opponent hero.
To use the wolf/bear properly, it needs to stay not too far from the ranger, to benefit from Spirit Companion. The ideal use is applying moonwell on the bear, casting howl, and when the bear is about to die, explode him and get a new one. It’s important to land the explosion, otherwise the bear might get on cooldown.
Druid
The druid is a ranged cast from the elves. He has a very wide panel of effects, giving him a lot of control of the battlefield. However, he is late game oriented. His right tree consists in making lasting effects on the ground, which later combines with his ultimate.
His left ultimate is also really good at negating/sniping enemy heroes. Lastly, his perks are healing based.
| Level | Default | Harassment |
| 1 | Blast, Elen’s fire, Focus | Blast, Obliterate, Focus |
| 2 | Obliterate, Focus | Rot stone, Focus |
| 3 | Cooldown, Cooldown | Elen’s Fire, Focus |
| 4 | Power, Nature’s gift | Power, Cooldown |
| 5 | Obliterate, Crush spirits | <–> |
| 6 | Focus, Cooldown | |
| 7 | Elen’s grasp, Elen’s Wrath | |
| 8 | Power, Power | |
| 9 | Power, Power | |
| 10 | Power, Elen’s grasp |
Default
In that build, we emphasize on the hero making value by himself. The elen’s fire gives a reliable damage on creeps, while Obliterate becomes increasingly powerful against armies. On level 5, we take the Crush spirits, so that we can remove the opponent hero from the game on good occasion. The Plan is now to spam Obliterate, which can even reach enemies out of reach.
We complete the build by using the right tree, as the slow really helps the elven army get the good surrounds on the opponent. If you don’t want to bother with too many spells, go quicker on power to get the most damage output of the hero.
Harassment
Here, the goal is to rush the enemy base at level 2, hopefully level 3. The plan is to harass the buildings and workers. You auto attack a building, then use the blast, and channel the rot stone on it. If done properly, it can do massive economy damage.
However, heroes can counter that with “interrupt” spells. It is particularly efficient against orcs, as Occultist rarely goes for the interrupt and Shaman doesn’t have an interrupt. You can use the elen’s fire to damage workers in the meantime, which is completed with the pathfinder(s).
In case you cannot finish the game here, you need to transition to any of the 2 other builds. You probably have a lot of focus, so maybe switching to the right tree is simpler, but you need to adapt with the situation.
Right tree
We are going to try to cover the ground in the right tree AoE as much as possible. It is quite straightforward and is meant to particularly work with your own army. The spells are quite spammy, so you might need a lot of focus to keep it up.
Note that in all 3 builds, for that hero, it is very possible to skip cooldowns, and prioritize power. In any case, your spellbook is full, and there is always something you can cast.
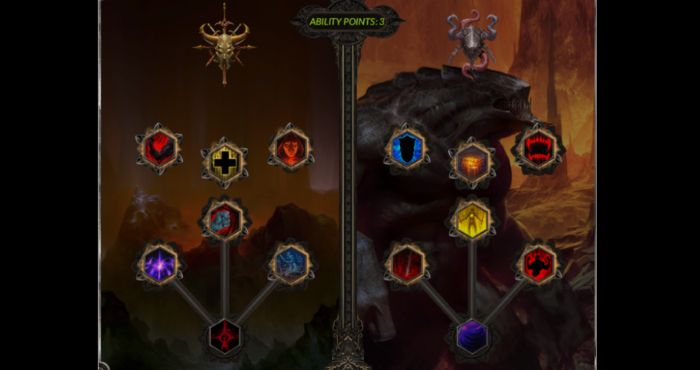
Dwarves
Warrior of the Depths
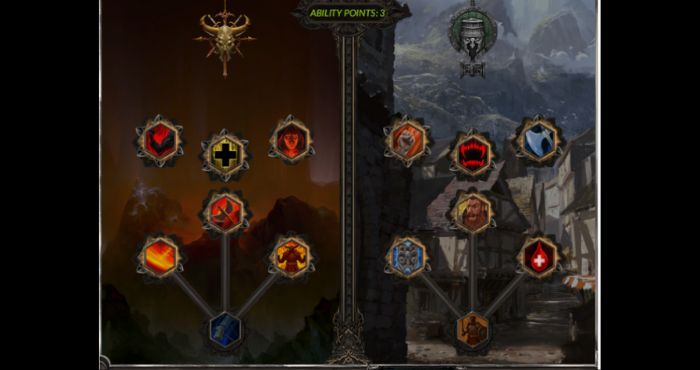
The warrior of the Depths is a very tanky melee hero. His special feature is that he drains focus out of combat. He has significant damage, and an array of spells to tank himself and with his army. His perks are here to further improve his defense and compensate for his focus issues.
| Level | Default | Captain | Brute |
| 1 | Headsplitter, Sweeping Strike, Inspiring presence | Sweeping Strike, Inspiring presence, Cooldown | Sweeping Strike, Inspiring Presence, Power |
| 2 | Cooldown, Relentless rage | Recuperate, Relentless rage | Power, Cooldown |
| 3 | Cooldown, Stalwart song | Cooldown, Stalwart song | Cooldown, Recuperate |
| 4 | Recuperate | Battle frenzy | |
| 5 | Cooldown, Precision stance, Inspiring presence | Cooldown, Precision stance, Inspiring presence | Sweeping String, Precision stance, Inspiring presence, Cooldown |
| 6 | Recuperate, Battle frenzy | Battle frenzy, Stalwart song | Bettle frenzy, Recuperate |
| 7 | Power, Sweeping strike | Power, Sweeping strike | Power, Deathblow |
| 8 | Power, Deathblow | Power, Power | Power, Power |
| 9 | Power, Power | Power, Power | Power, Power |
| 10 | Power, Power | Power, HP | HP, HP |
The nature of the Warrior of the depths gives some constraints in how to build that hero. You cannot skip Inspiring presence. You also need as fast as possible focus cooldown.
We also often need 1 point in relentless rage, as it gives a bit of wiggle room on poor focus management. But this can probably be avoided. The hero reaches his full potential by spamming his spells.
His range of spells also allow to keep spamming the spells without “watching” the battle. You can keep spamming healing spells, defense spells, focus, while managing your economy here and there.
The switch at level 5 makes a huge difference, as you start to never be low on focus.
Default
Here, we try to stay as efficient as possible early game, and adjust late game when it happens. The hero is still used as a tank as much as possible. That build allows you to send your hero alone to harass or defense, and split from your axeweilders.
Later, you try to draw the fire on your hero, so that your army can perform properly. Battle frenzy can be used to chase groups, but in large fights is used to enfeeble the opponent army. It will also redirect the AoE away from your army.
Captain
The build is rather similar, but you sacrifice a bit of hero damage output to focus for better synergy with your army. You will then try to attack more as a group, rather than the harass style. Late game, the concept remains the same as the default build.
Brute
In this build, you are trying to get the maximum value from just the hero only. You don’t try to buff your army, and try to output yourself as much damage as possible.
Since you only have 1 spell, placing yourself is really important. Since you are most likely to pick off units, using Deathblow will help your survivability more than stalwart song.
You will need 1 axe quickly to increase your damage, the other one has minimal impact. You need to maximize your armor to try to become unkillable.
Hierophant
The hierophant is a dwarf ranged hero. She has a strong damage output from her left tree. Her right tree is all about totem summoning. While she has a steady damage output during the early game, she suffers from a lack of AoE damage until she reaches her level 5.
Her left perk increases her range, synergizing with the left tree, while the right one enhances totems.
| Level | Default |
| 1 | Scattershot, Killshot, Power |
| 2 | Power, focus |
| 3 | Power, Bonebreaker |
| 4 | Power, Focus |
| 5 | Scattershot, Barrage |
| 6 | Cooldown, Cooldown |
| 7 | Power, Power |
| 8 | Eagle Eye, Eagle Eye |
| 9 | Eagle Eye, HP |
| 10 | HP, HP |
Default
This build is the simplest build for that hero. You try to find a pathing that reaches level 5 as fast as possible. Remember out of combat to activate scattershot to make sure you ammunition stays available for the next fight. Then you try to focus units 1 by 1. You use bonebreaker to interrupt the enemy hero, but aiming is not easy.
Try to buy the purple crossbow, as it impacts twice as much as other heroes with scattershot.
When you reach level 5, you try to find the sweet spot between getting as close as you can for a massive barrage and staying in safety. No need to switch into the totem build, this keeps the hero easy to use.
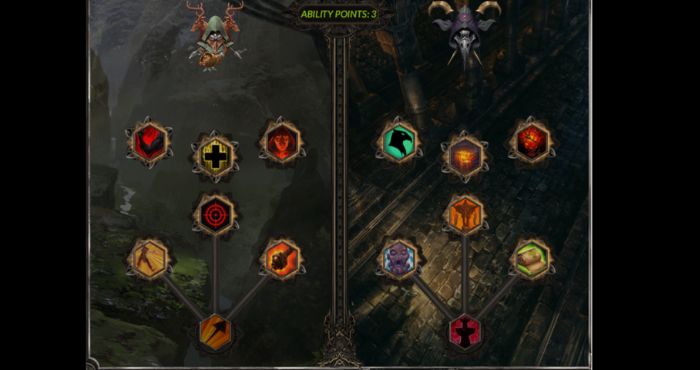
Orcs
Occultist

The occultist is a brutal melee hero. His unique feature is that he does not have a focus pool. Instead, he casts his spells based on his health. The theme of the hero is blood, making the enemies bleed and heal from the enemy’s pain. The drawback is that this hero has a lot of health variation, and needs extra attention.
His perks compensate for this weakness by giving him extra survivability.
| Level | Default |
| 1 | Blood sacrifice, Blood confluence, Demonic Pact |
| 2 | Cooldown, Death resilience |
| 3 | Cooldown, Nullify |
| 4 | Power, Death resilience |
| 5 | Cooldown, Blood confluence |
| 6 | Blood like tar, Death resilience |
| 7 | Nullify, Sanguine Burst |
| 8 | Power, Power |
| 9 | Power, Power |
| 10 | HP, HP |
Since the occultist doesn’t use focus, you can sell your potions at the shop, the first time you go there. The occultist starts by creeping with the demonic pact. You want to group all the creeps close together and 2 shot the group. Optimally, close to the flag.
Default
You try to have him as surrounded as possible to trigger the blood sacrifice. Let the enemies bleed, or use directly blood confluence when you are low health. So, you try to draw all the damage on yourself, you fake your pain with death resilience, and when you’re about to die, heal completely with blood confluence
His second usage is to use nullify to interrupt heroes and snipe valuable units running away. His endgame is to run around with blood like tar casting blood sacrifice, then sanguine burst and blood confluence.
Goblin Shaman
The goblin shaman is a control/support oriented ranged hero. He specializes in totems, which are put on the ground and cannot be targeted or interrupted, giving lasting effects on the battlefield.
His weakness lies in a lack of a single target/interrupt option. His ultimates involve summoning. His perks further advances his mastery of totems.
| Level | Default |
| 1 | Chain lightning, Fire Totem, Focus |
| 2 | Healing totem, Focus |
| 3 | Cooldown, Focus |
| 4 | Cooldown, Vex Totem |
| 5 | Summon totem, Chain lightning |
| 6 | Soul drain, Cooldown |
| 7 | Focus, Golem |
| 8 | Power, Power |
| 9 | Power, Power |
| 10 | Power, Power |
This hero is very focus heavy. Depending on your play style, you may need even more focus points. The hero always needs to start with chain lightning and a fire totem, and it is impossible to creep at a decent speed without them.
Default
This build is support oriented towards your troops. You place your offensive totems first, to zone the opponent in a certain direction, and after lay the healing totem. You can also start with chain lightning, and hope to get another one during the end of the engagement, sniping a few units.
Later, you can use the summoning spells to hopefully redirect some of the opponent AoE on worthless troops, as well as the golem for a large tanking and damage output.
Finally, you can try to use the soul drain, either to tank, or to ensure a safe teleport out of a fight going wrong.
Troll killer
The goblin shaman has a really hard time against trolls because of the lack of single target damage. An exact build order needs to be defined, but it involves skipping on healing in the early game, to focus on enfeeble/impair from the vex totem, and power for a chance at sniping units.
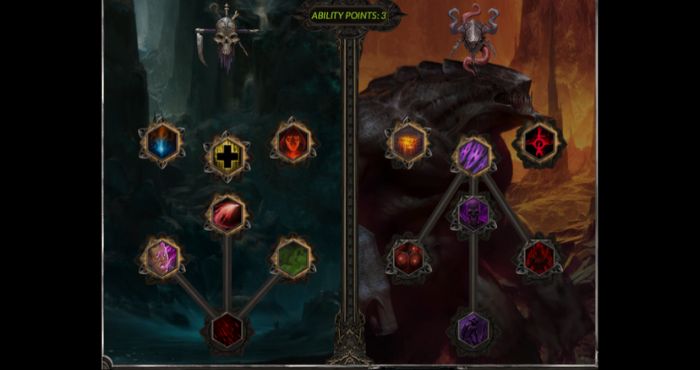
Dark Elves
Guardian of Nor
The Guardian of Nor is a melee hero with high mobility. His theme is around sacrificing his own troops for a larger effect than the normal effect oriented spells. His ultimate’s help him get deeper in the frey, and disable heroes. His perks are here to help him heal, increasing his survivability.
| Level | Default | Sacrificer |
| 1 | Debilitating blow, Soul explosion, Focus | Debilitating blow, Soul Explosion, Power |
| 2 | Soul Transformation, Cooldown | Cooldown, Focus |
| 3 | Blocking momentum, Cooldown | Soul Transformation, Plague field |
| 4 | Focus | Soul Catharsis, Focus |
| 5 | Soul Shield, Soul Transformation, Mark of Corruption | Soul Catharsis, Cooldown |
| 6 | Cooldown, Blocking momentum | Soul Transformation, Plague field |
| 7 | HP, Blocking Momentum | Soul Charge, Focus |
| 8 | HP, HP | Soul Charge, Soul Shield |
| 9 | HP, HP | Cooldown, Focus |
| 10 | HP, Power | Power, Power |
Default
In that build, you get the most value by landing the best soul explosion in the early game. You quickly get the Soul transformation, as it helps you take control of the map much faster, as well as harassing workers and heroes.
This is an aggressive build, where on level 5, your new goal is highly disabling the opponent hero. Try to continuously use soul transformation on the opponent hero, use soul explosion, and finally the Mark of corruption for the ultimate combo.
If you can, you keep using teleporting on the hero for an almost infinite silence, disabling the hero.
Because of this aggressive build:
- You will need to buy the shield right after the armor, to maximize blocking momentum and your healing in the frey.
- You accept that you won’t deal much damage yourself, so you need to also control the army a lot.
Sacrificer
This build is probably the best use case of the Potion of Fresh start, as you have a hard switch on the right tree, once you reach level 5, as you most likely will never use soul explosion and debilitating blow again.
Once you get your sacrificing spells, you try to buff your army right before the battle. Then, as soon as the battle starts, you shield your army from afflictions, to protect yourself from the hero, and finally now that your front line has reached the opponent, weaken them.
You can at the end of the battle and another speed buff to escape easier to chase down more units. You tend to stay in the back, but you can also use your hero for a bit of tanking.
Reaper
The reaper is a very offensive ranged hero. His power revolves around weakening the opponent, and spamming damage spells. He is themed around necromancy, summoning zombies and harvesting souls to empower himself. His ultimates are highly damaging spells, on both units and buildings. His perk underline further his glass cannon role.
| Level | Default |
| 1 | Void arrow, Hoard souls, Reanimate Souls |
| 2 | Focus, Cooldown |
| 3 | Focus, Corruption |
| 4 | Cooldown, Blood armor |
| 5 | Blood shower, Kiss of Nor |
| 6 | Cooldown, Focus |
| 7 | Corruption, Hoard souls |
| 8 | Power, Power |
| 9 | Power, Power |
| 10 | Power, Power |
It is probably a good idea, as soon as you make your hero, to activate your aura, and move its icon further on your skill bar, even maybe in the second skill bar. Once it is activated, you never want to remove it anyway. Also, remember to call your first zombie as soon as your hero is out. Since you start without focus, you need the time to get your focus back and be able to somewhat creep properly.
The difficulty of using the reaper is to keep the momentum with the zombies. Very early game, you have only zombies and they represent half your hero. If you lose them, you might not get enough souls to make more zombies, making your hero kind of powerless.
Default
Depending on how much XP is on the map, you might want to take cooldown before corruption, so that you can put more pressure on the hero from afar. You try to survive long enough with your hero, and try to not feed your zombies to the opponent, as they give XP. Use the corruption wisely, as it is rather costly in focus and not with guaranteed results.
At level 5, you start spamming your AoE spells. Place your blood shower between as many buildings as possible, and during the fight, summon your zombie in the enemy group to explode them right after with Kiss of Nor. You try to use most of your souls for additional armor via the blood armor. Later on, your blood shower changes its focus from buildings to units, to better combo with the Dark Elves army.
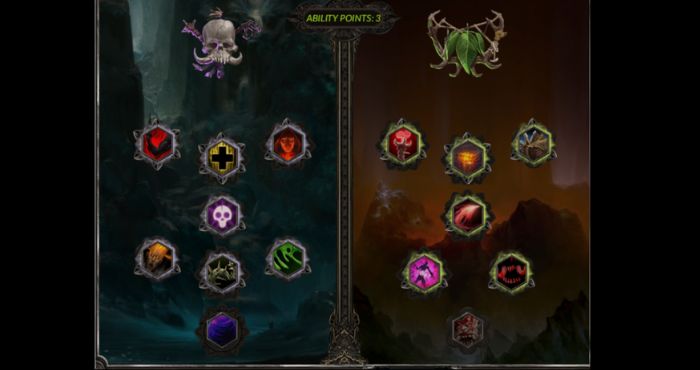
Trolls
Chieftain

The chieftain is a melee hero. His first identity comes from not having focus regeneration alone, but a whole spell tree which doesn’t consume focus. His second role is around buffing his army, and using his army to get back his focus to further rebuff the army. His right ultimate has an economic purpose, while the left one grants him immunity. His perks help his survivability and focus regeneration
| Level | Default | Commander (build by Pride) |
| 1 | Slam, Throw junk, Power | Slam, Throw junk, Join the Troll Guard |
| 2 | Power, Cooldown | March, Come here |
| 3 | Cooldown, Come Here | Power |
| 4 | Slam, Throw junk, Come Here, Thick Hide Rage | Slam, Throw junk, Join the troll guard, |
| 5 | Cooldown, Power | Train:Hexing, Thick Hide Rage |
| 6 | Power, Power | Power, Cooldown |
| 7 | Power, Pick up Junk | Power, Cooldown |
| 8 | HP, HP | HP, HP |
| 9 | HP, HP | HP, HP |
It is important to practice creeping with this hero, as he can 2 shot zombie groups, giving him the fastest creeping in the game.
Default
This build completely focuses on the left tree and making damage yourself. His style doesn’t change much across the levels. You try to slow the opponent, to land the best throw junk trickshots and massive damage with slam. After level 5, he tries to bait fire using his ultimate, and keep smashing.
Commander
The chieftain can be played like a support hero. The biggest early damage dealers in the Troll army is the Troll Crushers, because of their cleave ability that’s researched at the fighting hut. Their largest weakness happens to be movement speed kiting from your opponent with range units and their hero.
Opponents will typically try to pick off troll units one by one and look to take a favorable fight after the trolls have been whittled down. One troll unit is typically 6 food, a massive difference between 1-2 that other races have. The chieftain comes into effect by removing this disadvantage by utilizing multiple abilities.
The spell “Come here” and Bodyguard, mixed with the March ability, allow the Crushers to control the kiting. The idea is simple. You cast march before engaging your opponent ( lasts 15 seconds at level 1) And have some crushers as your bodyguard. The march gives them the move speed increase, and when the Chieftain comes in range of the opponents army.
He cast’s Come here to slow them down further. This is where you right click behind your opponents army, and right as they get on top. You Attack ground and take full advantage of the cleave.
If the chieftain gets ahaed of the opponents army, or slam is level two. A slam can be cast to do further AOE damage ideally, while your crushers and bodyguard is chasing your opponents army. You would like to be accomplishing a secondary goal, such as taking your opponents sector, teching further in the tech tree. or expanding into further sectors
into the later stages, you can pick up Hexing under your bodyguard tree for a high tier unit with little cost. Hexers require shrines of mugwa, a late tech, so the cost of one ability point is worth it in this case.
Because we also have a melee hero, the typical first investment is tier 3 armour. But if this cant be afforded due to early game pressure and the inability to farm early on some maps the armor necklace or ring can be taken in its place.
Ideally before your first big crusher push in the mid – late game, when your opponent can field a formidable force against your crushers, they will not be kiting as much, but if they do, the chieftain has the tool kit to take advantage of that.
You’ll normally be utilizing throw junk junk and slam on the front lines and letting your late tech units take control of the battlefield.
Plaguebringer
The plaguebringer is a ranged hero. His first identity is casting diseases on enemies, and capitalizing on it. The second identity is using the dead bodies for affecting the battlefield. His perks help his auto attack and embodies the Troll cannibal tradition.
| Level | Default | Alternative build |
| 1 | Disease, plague bolt, consume disease | Disease, plague bolt, consume disease |
| 2 | Focus, Cooldown | Focus, Cooldown |
| 3 | Power, Power | Focus, Power |
| 4 | Power, Power | Corpse Explosion, |
| 5 | Disease, Plague orb | |
| 6 | Consume disease, Cooldown | |
| 7 | Cooldown, Cooldown | |
| 8 | Power, Power | |
| 9 | Infect building, Infect building |
The merchant
The merchant is a neutral element of the game, which can buy and sell items for your hero. There is almost always one in your main base, and sometimes others in other places of the map.
Currently merchants don’t show on the mini map. So look thoroughly in your sector, he might be (too well) hidden.