
If you are completely new to the Granblue Fantasy Versus Rising game, I will preface this Ferry guide with information that can help, as there are some terms you may not recognize, or not know what frame data even is.
So, read this section to get a general understanding of how to apply it.
Understanding key terms
In short, each frame is 1/60th of a second, and learning when to hit the opponent is entirely dependent on this outside of player-to-player-specific mindsets and interactions.
Breaking it down, if a move is +1 on the block, and you have a 5-frame (5F) jab, and the OPPONENT has a 6-frame jab, then if you both do jab at the same time, you will both hit each other, a “trade.” Recovery refers to how long a move lasts until you can block again, such as when you miss the move.
However, if the opponent does a 7-frame jab, you will win the exchange, as you have more frames to work with, your move comes out before theirs. Similarly, if you do a move that is -8 on the block, and the opponent has a 7-frame jab, then they can punish you depending on distance, as there is that one extra frame of recovery for you.
In this game, there is also move crushing, where a move with a higher priority (H>M>L) will beat out another one if they hit on the same frame, keep this in mind as well.
How to play with Ferry in Granblue Fantasy Versus Rising? (Strategy & Gameplan) [Primer]
Ferry is a set play/zoning-type character with a whip and uses her pets to set up favourable situations. For her gameplan, Ferry wants to zone the opponent out while looking for an opening and punishing recklessness.
In the corner, she typically wants to set up into Geegee and get a throw combo, or use her instant overhead for some damage. Every move is important in the arsenal, and it’s good to learn when and how to use them. Another important thing to note is that her special 236X does not have a hurtbox, making them nice for keeping someone off or counterpoking.
However keep in mind these are rollable on reaction if you are predictable, and will lead to you getting punished if you fish for them.
Another thing to note is that her forward throw leaves the opponent at the perfect distance for 22L, while her back throw leaves them directly behind her for 22H, so both can be used for positioning.
Ferry Guide: Movelist
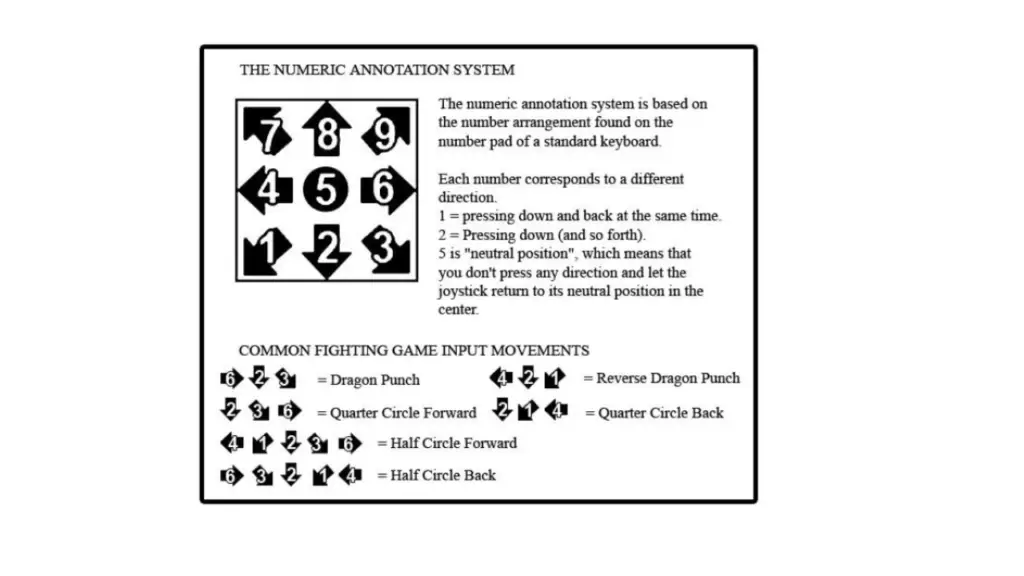
To start, please familiarize yourself with the numpad notation system, as it is what will be used in this guide. It is also used in many other anime fighting games, so learning it is essential, especially if you are new and just happened to pick Ferry as your first character.
Also, the notation for buttons will be using L/M/H/U (Light, Medium, Heavy, Unique) Light being square, medium being triangle, and so on. Bear in mind that any use of “EX” simply means using the heavy version of a move.
Cl. will be used for certain buttons, meaning “close”
One thing to note about Ferry is that many of her normals regarding her whip have a very extended hurtbox. This means that just tossing them out against characters can get you punished easily against good players.
Light Moves
cl.5L(LL) – A nudge by Nicola, as fast as 2L but is even on the block, into auto combo.
+4 on hit, 0 on block, 6F startup, 8F recovery. cl.XX is +1 on hit and -3 on block. cl.XXX is -0 on hit and -4 on block.
5L – A swing at the ground near the opponent’s feet, can be good for checking opponents and is not very committal, can only combo into 214L. Not a low.
-3 on hit, -7 on block, 8F startup, 15F recovery.
2L – Small jab at opponent’s feet, for if you are worried about the activation a range of 5L.
+3 on hit, -1 on block, 6F startup, 9F recovery.
J.L – Downwards swing with her whip especially useful with install active. A core part of her mixup, as it works as an IOH (instant overhead). To convert off it with her install, do j.L j.4U j.H(whiff) and you can land into c.5L.
7F startup. In recovery until landing.
cl.5M – Situational anti-air. Think elphelt c.S but worse. Way worse. Man, I miss Xrd. Still can be used for hitting angles where dp or 2H would not hit.
+7 on hit, 0 on block, 7F startup, 9F recovery.
5M – A nice button for poking midscreen, great range comparable to that of 5C. Can also be used to catch close jump-ins.
-3 on hit, -7 on block, 9F startup.
2M – Also your main button for midscreen poking, as it’s long and hits low. Good for catching the opponent trying to roll and also can low profile things like Katalina’s fireballs.
-7 on hit, -11 on block, 12F startup, 21F recovery.
J.M. – Very nice reaching air to air.
9 frame startup.
Heavy Moves
cl.5H – Beppo kicks in front of her, preferred starter. Her ONLY plus normal on the block. Can frame trap most of the cast if you do this into itself?
+7 on hit, +3 on block, 9F startup, 12F recovery.
5H – An alternate choice to 5M, avoid whiffing this.
-11 on hit, -15 on block, 14F startup, 28F recovery.
2H – Nice anti-air to try to preemptively catch people jumping, or on their way down if they’re at a distance. Can also function as a poke. Can combo with 236B on CH. Air blockable, be wary using this as an anti-air and committing.
+1 on hit (grounded hit), -10 on block, 14F startup, 21F recovery.
J.H. – Used in jump-ins when you are going deeper and want more damage than j.L, as well as safe jumps.
10 frame startup.
Unique Moves
5U: Ein Ball – A multi-hit move that deals a substantial amount of chip if she’s close. Also scales well in combos. Can cancel this.
+2 on hit, -2 on block, 17F (30 for the second portion), 22F recovery In midair j.4/5/6U: Spectral Dive – Divekick where Ferry twirls her whip around her.
Direction can be influenced by 4 and 6. If aimed at the opponent’s feet, it’s a plus. Very useful for hopping over low pokes, as well as use in installation.
15 frame startup.
In midair j.8U: Ghostswing – Ferry uses her whip to hang from the top of the screen and swing, you can swing backwards as well as go into an aerial attack with it. Great if you feel the need to approach, or leave the corner. When you use this you can alter your air movement by pressing a button to bait out anti-airs.
2U: Standard sweep, used for a quick knockdown or combos, goes into 236236U. Great ender, a great poke, and overall a wonderful button.
Knockdown on hit, -7 on block, 9-frame startup.
Specials
Ferry’s specials are mostly based around keep away (Gespenst) and setplay (Geegee). Using them to keep the opponent away or pull them to you is a very valid strategy, especially using EX Geegee after pulling them to you, or Trombe to push them back.
Gespenst

Ferry swings her whip and grabs the opponent.
L version: Short startup and short reach, good for hitting people trying to press something after a blocked 5M/H. Cannot combo after.
21F startup, -4 on block, 30F recovery.
M version: Long startup and far reach, can combo after with cl.5X, even if they are fullscreen a whiffed button will likely extend their hurtbox into it, but long startup makes it unreliable to use on reaction.
32F startup, -4 on the block, 30F recovery.
H version: Long reach of M version, while also having the speed of the L version. Can pick up with c.5L if close. Plus for some reason?
20F startup, +2 on block, 30F recovery.
Upon hit of any of these, you can do two follow-ups:
Whip it Good – Follow up to Gespenst, L/M/H when Gespenst hits.Gives hard knockdown and extra damage. Can toss out Geegee for a bit of Oki.
Heel – Follow up to Gespenst, 4L/M/H when Gespenst hits. Pulls the opponent towards Ferry’s feet, with the right timing you can do cl.5X and combo after with the B version or with the right spacing with the C version, or you can try setting up for Geegee instead.
Geegee, Get ‘Em!
L version: Sends Geegee in an arc closer to Ferry, great for controlling air space.
22F startup, 45F recovery.
M version: Sends Geegee in an arc farther away, possibly useful for discouraging throwing fireballs fullscreen.
22F startup, 45F recovery.
H version: Sends Geegee along the ground instead of in the air, great for corner oki.
22F startup, 45F recovery.
After landing on the ground Geegee will then surround itself in energy before disappearing. If Ferry has to block, is hit, or Geegee gets hit, he will disappear.
It is also useful for IOH mixups, but there are ways to get around this setup that will be elaborated on later.
Geegee is also useful as a neutral tool after a blocked 5M/5H, as if you get him out you can hold down the skill button to vary the timing of when he will go off, giving you a chance to approach and back the opponent further into the corner or force an approach.
Trombe

L version: Fast, doesn’t push back very far.
16F startup, -5 on the block, 16F recovery.
M version: Slow, but has a lot of push block. Can work as a frame trap, getting a CH with this in the corner gives you a good combo.
25F startup, -3 on block, 16F recovery.
H version: Combines both the L version’s speed and M’s pushback, however, its main use is in corner combos as it wall bounces.
16F startup, -3 on block, 16F recovery.
A good blockstring ender if you want more room away from the opponent. Additionally, it can be used when you are pressuring with normals and anticipate the opponent will try to force their way in.
Mix this in with dodges and geegee to make your zoning less predictable.
Beppo, Sic ‘Em!
L version: Hits further behind Ferry’s head, useful for anti-airing late, but can be air-blocked.
7F startup, -16 on block, 21F recovery.
M version: Hits closer in front of Ferry.
13F startup, -11 on block, 21F recovery.
H version: Invul DP, however, its hitbox isn’t great, as some characters can low profile it during pressure…
Overall a nice anti-air that covers a higher range than 2H doesn’t, be sure to watch distance when using 623H.
11F startup, -26 on the block (you’ll die), 39F recovery.
Vergiften

Ferry brings in Momo to send a large spirit ball in the direction she is facing. This ball bounces along the ground and can be run under. Can be used to lock in a kill with chip damage or to dominate neutral for a moment.
Sending out EX geegee before this makes it especially hard to deal with as if the opponent blocks either you can mix in Ein Ball for a large amount of chip.
Does not disappear if Ferry is hit, and bounces from the corner, allowing you to massively restrict opponents’ options. 7F startup before the flash, 9F after, +45 on the block (lol), 41F recovery.
Hin Liechten

Ferry gains the ability to repeat any button into another upon activating and causes a timer to deplete in place of her meter. It can also be used to convert off her J. L., so overall it opens up many options in the corner with mixup.
Also because using Skybound Arts no longer sends all skills into cooldown, there can be room for combo and blockstrings with it. Overall a very flexible super and is almost always useful if you know how to use it since it makes your zoning even less predictable with normals since you can repeat.
Do note that when the installation is on, her special moves will not come off cooldown. 7F startup before flash.
Aetheryte Requiescat (SSA)

Ferry slides her whip alongside the ground and if it connects, her pets go after the enemy, ending in a large explosion. Not a low. Combos after almost anything you can think of, get used to comboing into this from stray hits to make your neutral scarier.
7F startup before the flash, 6F after, don’t whiff or have this hit on the block.
Granblue Fantasy Versus Rising Ferry Combos Guide
cl.5LLL > 214L or 236H4X, L version works on crouching.
Damage & notes: Very basic bnb. Can use Heel instead to set up for Geegee, or simply end with Trombe. Trombe pushes back and causes a bit of chip as well so it’s safe to do this on the block as well more or less.
236M 4X > cl.HHH
Damage & notes: Another basic bnb off of 236M, as unlike the other versions you can combo if the opponent is close enough.
CH 22L/M (high hit) 2H 236L 4X 236M 4X c.H 623M
Damage & notes: A tricky conversion off of 22L/M midscreen! Very rewarding overall, even without a meter.
IOH j.L + 22H detonation > cl.5H > 236236H > dash 214H > 2U > j.H
Damage & notes: EX dumping route into a safejump, leaves opponent in corner afterwards. Be sure to time J.H. correctly to properly safe jump. Can use the same theory with 22A to save EX geegee.
Okizeme and Setups
For those unfamiliar, Okizeme refers to setting up attacks over the opponent’s recovery and forcing them into bad situations. Ferry in particular focuses on putting her opponent into a vortex of attacks to keep them guessing or mixing them up.
236X > 4X > 22H > 5L > j.L/2L
The basic current theory behind Ferry’s basic okizeme is to simply combo into 236X 4X > 22H > Meaty button > 2L or IOH j.L.
EX Geegee (22X) is best after pulling in with Heel (4L follow up to 236M) and if the opponent is in the corner. Remember that Geegee takes a moment for himself to detonate, so using a button (5L) to meaty into its activation makes it tight enough to prevent the opponent from pressing a button.
If you are in install, you can combo off of this.
214214H > 2U > j.L or 2L
As for moves in installation, using 2U-to-end combos, especially mid-screen, is suggested.
That’s all for this Granblue Fantasy Versus Rising Ferry guide primer. Check out the new posts below:
Granblue Fantasy Versus Rising tier list | Granblue Fantasy Versus Rising Gran Guide | Granblue Fantasy Versus Rising Lowain Guide | Granblue Fantasy Versus Rising Katalina Guide | Granblue Fantasy Versus Rising Metera Guide | Granblue Fantasy Versus Rising Lancelot Guide | Granblue Fantasy Versus Rising Percival Guide | Granblue Fantasy Versus Rising Cagliostro Guide | Granblue Fantasy Versus Rising Zeta Guide | Granblue Fantasy Versus Rising Yuel Guide | Granblue Fantasy Versus Rising Beginner’s Guide | Granblue Fantasy Versus Rising Graphics Fix